
La Platera Tiles: Pick a Look You’ll Love in 2026
Find la platera tile inspiration for Brampton kitchens and baths—looks, sizes, grout, and install tips—then test samples and plan a clean, confident renovation.
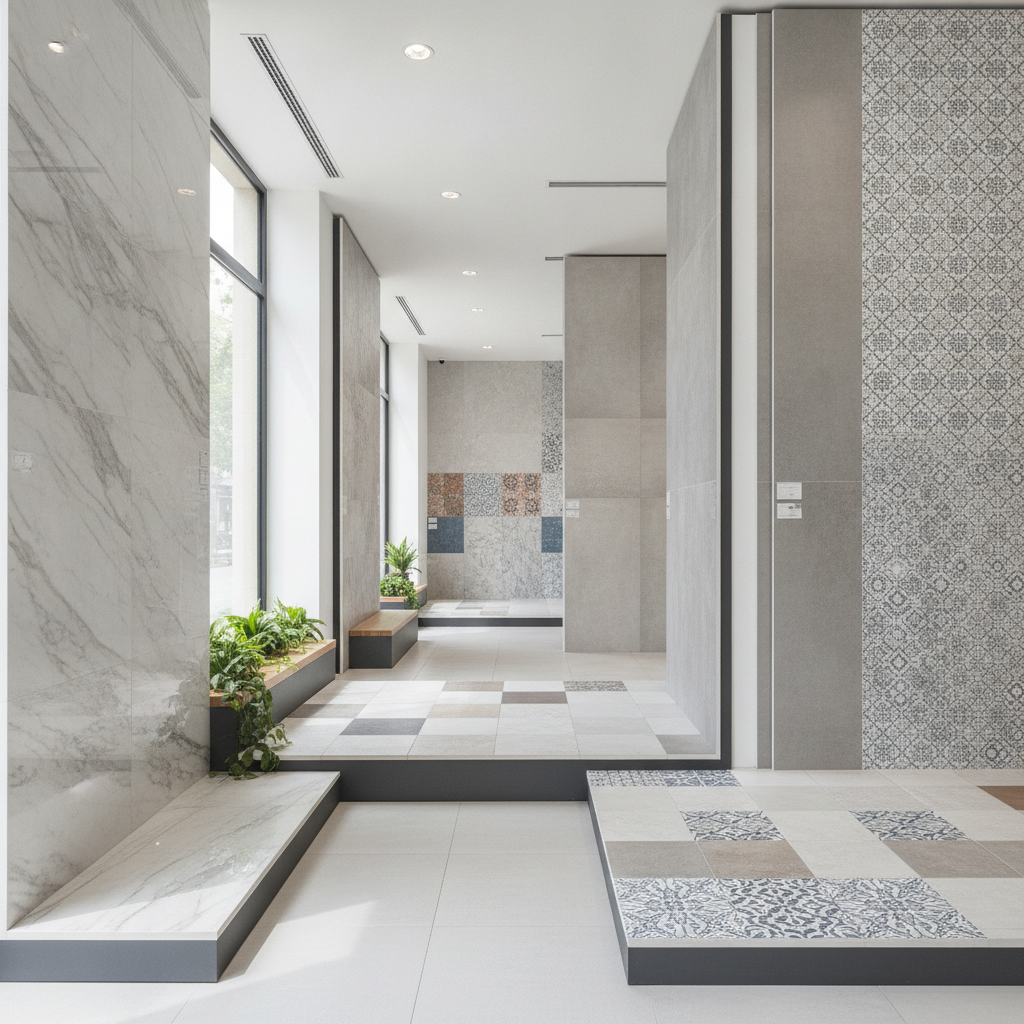
La Platera tile inspiration is the set of design ideas, color stories, and patterns drawn from La Platera’s Spanish-made porcelain and ceramic ranges that you can apply across Brampton kitchens, baths, and living areas. It combines marble-look, concrete-look, wood-look, and encaustic-style options to achieve durable, low-absorption, cohesive spaces that last.
By Metro Tiles & Flooring • Last updated: 2026-06-29
Start Here: Find Your La Platera Look
Start with your lifestyle, then match a La Platera series to use, traffic, and light. Pick a hero tile first, confirm slip resistance and maintenance needs, then layer complementary sizes and trims. Finally, preview grout, layout, and edge details with samples before booking professional installation.
Ready to turn a mood board into a finished floor or wall? This complete guide shows how to choose, combine, and install La Platera tiles with confidence—tailored to Brampton homes, condos, and commercial spaces. You’ll see what works, why it works, and the simple steps to get there.
- Design foundations: marble-look, concrete-look, patterned, and wood-look options
- Layout patterns that minimize lippage and highlight room geometry
- Slip resistance, water absorption, and grout choices that boost longevity
- Condo underlayment tips and sound ratings to keep neighbors happy
- Real examples you can adapt room-by-room
- Where to see and touch products in our Brampton showroom
At a Glance
La Platera tiles deliver Spanish design with porcelain performance: low absorption (often under 0.5%), durable PEI wear ratings, and rectified edges for tight joints. Choose a signature series, confirm slip ratings for wet areas, and trial samples at home to see color in real light.
Great rooms start with clear choices. Use this overview to align look, performance, and upkeep before you commit to a palette or pattern. Then use the sections below to finalize layout, grout, and installation details.
- Surface: porcelain for floors and wet walls; ceramic for dry feature walls
- Finish: matte for traction; polished for light bounce; textured for character
- Sizes: mosaics to 24×48 inches; larger panels reduce grout lines
- Joints: rectified edges allow 1/16–1/8 inch grout for a sleek look
- Ratings: aim for dynamic coefficient of friction (DCOF) around 0.42+ in wet zones
What Is “La Platera Tile Inspiration”?
La Platera tile inspiration is a design approach that curates La Platera series, sizes, and finishes into cohesive rooms. It blends hero surfaces with supporting accents, uses rectified edges for clean lines, and balances traction, light, and maintenance for everyday living.
Think of it as a kit of parts tuned to your space. You pick a primary tile—perhaps a marble-look porcelain—then add a complementary field size, a mosaic for niches, and trims that finish edges cleanly. Because most porcelain absorbs less than 0.5% water, it confidently handles showers, entries, and kitchens.
- Hero surfaces: marble-look and concrete-look porcelains create the backdrop
- Accent moments: geometric or encaustic-style patterns add energy
- Support pieces: bullnose, thresholds, and coordinating mosaics complete details
When clients visit our Brampton showroom, we lend samples so you can check undertones next to cabinets and paint. Two tiles that look similar in the store can read very differently beside your lighting at home—samples remove that guesswork.
Why La Platera Matters for Brampton Renovations
La Platera pairs European style with everyday durability. In Brampton’s busy households, porcelain’s low absorption, strong PEI wear ratings, and easy cleaning reduce upkeep while delivering designer looks that outlast trends—ideal for kitchens, baths, entries, and condos.
Tiles have to work as hard as they look good. Kitchens see spills; baths see steam; entries see salt and grit. Porcelain’s density and stain resistance make weekly care simple—most families appreciate that. Add rectified edges, and you can run tight joints (often 1/16–1/8 inch) that minimize grout lines and visual noise.
- Durability: PEI wear ratings guide floor suitability from low to high traffic
- Safety: aim for a DCOF near 0.42+ for wet floors to improve footing
- Moisture: porcelain’s low absorption helps prevent warping or staining
- Longevity: neutral stones and soft concretes stay timeless for resale
Local considerations for Brampton
- Transit access: If you’re planning a quick showroom visit, the Intermodal - Zum Bovaird Station Stop NB makes it easy to time pickups for samples and returns.
- Seasonal reality: Winter salt and meltwater demand entry floors with matte finishes and tight grout; plan for durable doormats and a 3-by-5 foot “wipe zone.”
- Condo nuance: Many buildings expect IIC 60+ and STC 50+ with soundproof underlayment beneath hard surfaces—ask us to match underlayment to your board’s rules near Airport Rd n/of Clark Blvd.
How to Build a Room Scheme with La Platera
Choose a hero tile, confirm slip and wear ratings, then layer one supporting field size and one accent. Mock up a 3×3 layout at home, test grout colors in daylight and evening light, and finalize edges, thresholds, and transitions before scheduling installation.
Great rooms follow a repeatable sequence. Whether you’re redoing a shower or a whole main floor, this six-step flow keeps decisions clear and prevents change orders late in the project.
- Pick your hero. Marble-look for classic calm, concrete-look for modern minimal, patterned for energy, or wood-look for warmth.
- Right-size the field. Large-format (e.g., 24×48) reduces grout; mosaics (2×2 or 2×6) add traction in wet zones.
- Confirm performance. For floors, check PEI and DCOF; for showers, confirm porcelain’s absorption and a 95% mortar coverage target in wet walls.
- Choose grout. Neutral warm grays hide daily dust; narrow joints (1/16–1/8 inch) suit rectified edges and modern lines.
- Map layout. Favor 1/3 offsets for plank formats to control lippage; center lines in small baths to balance cuts.
- Finish edges. Bullnose, metal trims, or mitered corners protect transitions and niches.
| Decision | Best For | Typical Spec | Pro Tip |
|---|---|---|---|
| Floor finish | Entries, baths | Matte, DCOF ~0.42+ | Pair with darker grout to mask traffic lines |
| Field size | Open rooms | 24×48 inches | Check doorway clearances and furniture paths |
| Shower base | Traction | 2×2 or 2×6 mosaic | Use epoxy grout for stain resistance in niches |
| Plank offset | Wood-look | 1/3 stagger | Limits lippage on slightly bowed tiles |
We keep take-home samples and create small board mockups in store. A 3×3 layout on the floor reveals how veining, shade variation (V1–V4), and grout color really interact under your home’s lighting.
Types, Sizes, and Finishes in La Platera Collections
La Platera spans marble-look, concrete-look, patterned, and wood-look tiles across multiple sizes—from mosaics to 24×48 inches—with matte, lappato, and polished finishes. Rectified edges enable tighter joints; coordinating trims and mosaics complete showers, backsplashes, and transitions.
You can build an entire home palette from one family of tiles if you mix sizes and finishes intelligently. Here’s how the main looks behave and where they shine.
Marble-look porcelain
- Why it works: gentle veining adds movement without busy visuals; polished versions bounce light, matte provides traction
- Where to use: primary baths, large-format kitchen floors, feature walls
- Specs to note: porcelain absorption often
Concrete-look porcelain
- Why it works: low-contrast, mineral tones that hide dust and daily wear
- Where to use: open-plan floors, entries, laundry rooms
- Specs to note: matte finishes improve DCOF; rectified edges align cleanly in grid layouts
Patterned and encaustic-style
- Why it works: statement visuals in small doses—powder rooms, niches, mudrooms
- Where to use: backsplashes, fireplace surrounds, shower feature bands
- Specs to note: mix with quiet fields; keep grout aligned to avoid pattern drift
Wood-look planks
- Why it works: warmth of wood with tile durability, perfect for pets and spill zones
- Where to use: kitchens, family rooms, basements
- Specs to note: plank widths 6–9 inches, lengths 36–60 inches; 1/3 offset reduces lippage
See current selections in our La Platera category—updated as new series arrive and older ones rotate out. Browse what’s in stock and shortlist favorites before you visit.
Best Practices for Layout and Installation
Plan movement joints, set appropriate grout widths, and verify substrate flatness before tiling. Target 95% mortar coverage in wet zones, check lippage with a straightedge, and dry-lay complex patterns. Use 1/3 offsets on planks and align large-format tiles with room sightlines.
Installation quality drives long-term performance. Even the most beautiful tile disappoints if the substrate telegraphs bumps or if grout joints wander. A few checkpoints make all the difference.
- Flatness targets: for large format, aim for ≤1/8 inch variation over 10 feet to control lippage
- Mortar coverage: >90% on interior floors; ~95% in showers and wet walls
- Joint planning: rectified tiles run 1/16–1/8 inch; non-rectified may need wider joints
- Movement joints: include perimeter and field joints to handle expansion/contraction
- Transitions: coordinate heights to adjacent hardwood or vinyl for safe, flush thresholds
Our in-house team installs tile daily across kitchens, showers, entries, and condo suites. We align layouts to door sightlines, use leveling systems where appropriate, and protect finished areas during curing to prevent surface transfers.
Tools, Samples, and Resources You’ll Use
Use showroom samples, layout boards, and grout sticks to preview color and spacing. Pair porcelain with quality mortars, seal cementitious grout, and confirm underlayment IIC/STC ratings for condos. Keep a project folder with spec sheets, layout notes, and approvals.
Great decisions happen when you can see and touch options. That’s why we send you home with samples and build mini mockups in store before you finalize.
- Samples: compare 12×24 and 24×48 at home; note how cool grays shift under warm LEDs
- Grout sticks: hold charcoal vs warm gray against veining to see contrast
- Spec sheets: absorption rates, DCOF, PEI wear ratings—store them in your folder
- Underlayment: many condos require IIC 60+; bring your board’s rules and we’ll match
- Delivery: we coordinate GTA delivery windows so product arrives after prep finishes
If you are exploring alternatives for adjacent rooms, our wood-look vinyl planks and engineered hardwood options can blend seamlessly with La Platera floors in open plans. See trend notes for tone continuity across materials.
Reference: hardwood tone trends for 2026
Case Studies and Real-World Examples
Anchor each project with one hero tile, then use supporting sizes and trims. In showers, pair large wall formats with 2×2 mosaics for traction. In open plans, run 24×48 tiles on a grid to extend sightlines and reduce maintenance.
Here are simplified scenarios based on what we commonly design and install for Brampton clients.
Primary bath refresh (condo)
- Hero: marble-look 24×48 on walls for a calm, slab-like feel
- Floor: 2×2 mosaic in the same family for grip (DCOF ~0.42+)
- Details: mitered niche edges; epoxy grout in shower areas for stain resistance
- Condo layer: IIC 60+ underlayment under any hard surface outside the bath
Family kitchen (semi-detached)
- Hero: concrete-look 24×48 on the floor to hide crumbs and scuffs
- Backsplash: subtle patterned tile behind range for depth without clutter
- Details: warm gray grout; grid layout to echo cabinet lines
- Pets/kids: sealed cementitious grout or pre-mixed stain-resistant options simplify cleanup
Basement media room
- Hero: wood-look plank porcelain for warmth and water resistance
- Pattern: 1/3 offset, 6–9 inch widths to keep movement realistic
- Trim: reducers to adjacent carpeted stair landing; soft base for sound control
- Lighting: matte finishes prevent projector glare on movie nights
Want more ways to use tile beyond kitchens and baths? We collected seven unexpected locations that can transform daily routines.
See our guide: 7 unexpected places to install tile
Planning, Scheduling, and Non-Pricing Considerations
Plan lead times for special-order tiles, confirm condo approvals, and schedule delivery after subfloor prep. Align plumber, electrician, and tile installer timelines to avoid rework, and document grout color, joint size, and layout so everyone builds to the same plan.
While we don’t publish dollar figures, it’s smart to plan the project logistics that drive a smooth experience. A few calendar and coordination moves save time and protect finishes.
- Lead time: stock items are immediate; special orders may need extra weeks—plan backup choices
- Approvals: secure condo permissions early; many boards meet monthly
- Delivery: book after demolition and prep to protect crates from moisture and dust
- Protection: cover new floors during cabinet installs; use breathable protection during curing
- Documentation: record layout drawings, grout color names, and trim profiles
If you are comparing surface categories for adjacent spaces, these primers explain common installation steps and what to expect on site. They’re broad overviews that help you ask better questions during a consult.
Learn more about tile installation basics and a general tile flooring installation overview. For patterned looks, browsing a palladio-inspired collection can help you visualize motifs next to calm fields.
Beyond La Platera: Coordinating Brands and Textures
Mix La Platera floors with complementary brands for accents or transitions. Pair a quiet La Platera concrete-look field with a Baldocer marble wall, or run Gayafores patterns in a powder room against a neutral La Platera main floor for cohesion without monotony.
We curate multiple European brands so you can combine neutrals, patterns, and textures without clashing undertones. The goal is one continuous story across entries, kitchens, baths, and basements—each zone with its own emphasis.
- Match undertones: keep warm-to-warm or cool-to-cool across rooms for flow
- Vary scale: large floors with small-scale mosaics prevent pattern fatigue
- Accent smartly: limit bold motifs to compact zones like powder rooms
Explore sibling ranges to expand your palette or find that perfect accent tile that elevates a calm field.
Browse our Baldocer collections alongside La Platera to plan mix-and-match combinations.
Free in-showroom consult: Bring photos and your condo board’s underlayment rules. We’ll build a mini layout, pick grout, and map delivery so your renovation stays on schedule.
Frequently Asked Questions
La Platera FAQs cover slip resistance, grout color choice, and condo suitability. In brief: choose matte for wet floors, test grout against your tile at home, and confirm IIC/STC ratings for any hard surface in condos before scheduling installation.
Is La Platera porcelain good for shower walls and floors?
Yes. Porcelain’s low water absorption (often under 0.5%) makes it ideal for showers. Use large formats on walls for fewer grout lines and a coordinating 2×2 mosaic on the shower floor to improve traction and drain slope.
What grout color works best with marble-look tiles?
Warm light gray often complements veining without high contrast, keeping a stone-like feel. Always test two or three shades on a dry layout at home—daylight and warm evening light can shift how whites and grays read.
Can I use La Platera wood-look tiles next to real hardwood?
Absolutely. Choose a complementary tone and use a flush or gently sloped transition strip for safety. Keep plank directions aligned at major sightlines, and consider a 1/3 offset to maintain a natural wood rhythm.
How do I plan for condo soundproofing under tile?
Check your building’s rules and target IIC 60+ and STC 50+ for hard surfaces. Bring requirements to the showroom; we’ll recommend underlayment assemblies that meet or exceed those sound ratings without raising transitions too much.
Key Takeaways
Pick one hero La Platera tile, match performance to room use, and confirm details with samples. Use tight grout, plan movement joints, and coordinate condo underlayment early. The result is a cohesive, low-maintenance space that feels designed—not improvised.
- Choose hero, field, and accent in one family for visual harmony
- Target DCOF ~0.42+ in wet zones and narrow grout with rectified edges
- Dry-lay 3×3 mockups to validate veining, shade variation, and grout color
- Document layout and trim details so installers build exactly what you envisioned
Continue Your Tile Journey
See La Platera in person, compare Baldocer accents, and collect samples for at-home testing. Reading trend pieces and room-by-room guides helps you finalize tones and transitions before installation begins.
Visit our Brampton showroom to handle surfaces and plan layouts in real time. To round out your project playbook, skim these in-house resources and product pages as you shortlist designs.
Compare looks in our La Platera category and explore Baldocer collections for complementary accents. If you’re considering wood-look continuity in nearby rooms, review 2026 hardwood trends and wood-look plank options like Plank Pristine or Plank Calm. For layout ideas outside kitchens and baths, check tile beyond the usual rooms.
Conclusion: From Inspiration to Installation
Define your look, validate performance, and decide details early. With La Platera’s range and our Brampton team’s guidance, you can create rooms that feel calm, durable, and connected—then install them on a clean, coordinated timeline.
Here’s the path forward that works for most homeowners and property managers we serve:
- Shortlist two or three La Platera series online and book a showroom visit.
- Borrow samples, build a 3×3 layout at home, and pick grout and trims.
- Confirm condo underlayment or subfloor prep, then schedule delivery and installation.
When you’re ready, bring photos and measurements. We’ll turn your la platera tile inspiration into a plan you can execute with confidence, from backsplash to basement.
Topics